
Last month I wrote a post about the art of mastering a song by adjusting its frequency bands through carefully analyzing the spectrogram, something I had never bothered to figure out before. Here’s that post.
Although I haven’t produced any new songs with Udio, because I’m trying to finish a novella I’ve been working on for seven goddamn months, I’m halfway through remastering the third volume of Odes to My Triceratops, which are a bunch of concept albums about a triceratops. I’ve changed how I master audio in subtle but powerful ways, so read on if you give a shit about this stuff.
- Download the WAV file of the song from the Udio interface.
- Open the original WAV in Audacity.
- Normalize both channels at -1db.
- Export it as a 24-bit/192KHz WAV stereo file. I read somewhere that you shouldn’t try to master audio using a WAV file of lower quality, and never ever using an MP3, which are compressed to begin with.
- Forget about Audacity and open a better audio editing program. I use iZotope RX 10, which is perfect for my purposes. Load the recently exported WAV file.
- Modify the EQ based on good base values (you can look up some and save it as a preset). Ensure that it comes with a high-pass filter at 30hz (roll off 24 db); apparently the human ear doesn’t hear anything below that frequency, so you’d just be leaving pointless data in.
- Normalize at -1db.
- Don’t bother with compression, multiband or not; I’ve come to believe that applying compression to a song is a crutch, because you can achieve similar but far better results by adjusting the individual frequency bands.
- Apply an azimuth operation on the song. It equalizes the volume of both channels and ensures that they are in sync, in case the audio came with some unsightly delay due to poor handling of mics. That won’t happen with Udio songs, but you might as well do so. However, blindly azimuth-ing a song can bite you in the ass: some parts of the song might only sound on one channel for artistic reasons, so ensure that you relisten to the whole thing afterwards. If the azimuth operation clearly shouldn’t have been applied to a specific segment of the song, revert the operation and only apply it to the rest of the song.
- Normalize at -1db.
- Now comes the fun part: messing around with frequency bands. iZotope RX allows you to set six manipulation points along the whole frequency spectrum. You should put each manipulation point smack in the middle of the following frequency ranges (you can prepare these manipulation points and save the set as a preset):
- Bass (60-250 Hz)
- Low Mids (250-500 Hz)
- Midrange (500 Hz – 2 kHz)
- Upper Midrange (2 kHz – 6 kHz)
- Presence (6 kHz – 10 kHz)
- Brilliance (10 kHz – 20 kHz)
- Go to your favorite part of the song and EQ each frequency band one by one, raising and lowering its volume little by little as you listen on your absolute best headphones. I own a pair of $400 noise-canceling headphones by Sony which do a fantastic job of isolating me from this horrid world.
- Notes on what raising or lowering each frequency band affects:
- Bass (60-250 Hz): mostly the punch of drums, as well as similar instruments. I usually want them punchy, but it can distort the vocals if you go too high.
- Low Mids (250-500 Hz): this is an interesting frequency band: too low and the voices and instruments will sound tinny, too high and the song will sound like mud. It features the “body” of many instruments.
- Midrange (500 Hz – 2 kHz): mainly voices and guitar-like instruments.
- Upper Midrange (2 kHz – 6 kHz): most of percussion that isn’t too bassy. This one is very easy to EQ for the entire song: raise and lower this frequency band until the pitch of the drums sounds right. If you raise it too high, some singers’ “S” sounds will hurt your ears.
- Presence (6 kHz – 10 kHz): high lingering sounds like hi-hats, cymbals, and such. You can rarely raise or lower this much without altering the pitch of other percussion instruments, so I suggest very narrow frequency range manipulations in this range.
- Brilliance (10 kHz – 20 kHz): this one is a bit hard to describe. Some call it “air,” similar to the sound your thumb and index finger make when you rub them together. It provides interesting details. A base EQ should likely raise this by about 8db. If you raise it further, it will likely screw with the pitch of the drums.
- Apply the EQ changes you prepared for your favorite part to the entire song. Particularly when working with Udio songs, it’s rare that the rest of the song requires very different EQ levels than your preferred part, so your changes act as a great new baseline.
- Go through each part of the song and apply individual changes to their frequency bands depending on that part’s needs: sometimes a segment should be more bassy, or the midrange be 3db higher because the guitar won’t sound as good otherwise, etc. However, ensure that you don’t screw up the transitions between the different segments of the song. This can easily happen if you raise the upper frequencies too much in one segment in comparison with the adjacent ones.
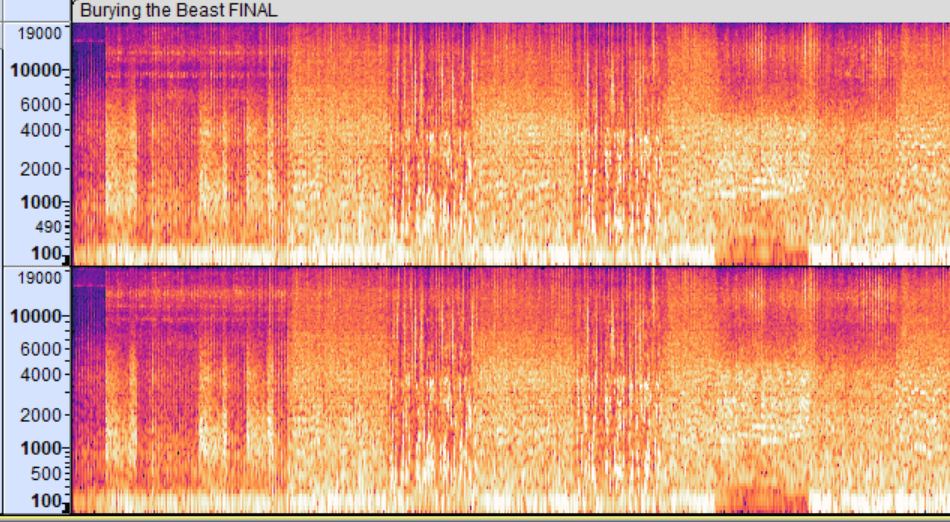
- When you’re happy with the state of the entire song, revise its spectrogram focusing on “instrument or vocal stripes” (not sure what to call them) that are either too white (meaning too loud in comparison to the rest of the spectrum) or not white enough (are buried in the mix).
- If you spot instrument stripes that are isolated between frequency bands, and that aren’t affected much by raising or lowering those manipulation points, hover your cursor over that line to figure out what frequency it’s located at. Then, move one manipulation point to that frequency and pinch the range of frequencies the manipulation will affect by scrolling with your mouse. This is a fantastic operation that I recently discovered. It that allows you to bring attention to isolated, perhaps even buried instruments like cowbell, ankle rattlers, tambourine, etc.
- For example, in the images seen after this list, that solid strip in the “presence” frequency band is located at the 8100 Hz frequency, and is some sort of fancy percussion instrument. If you attempt to bring it further to the surface with a general manipulation point, you’ll distort the pitch of the drums.
- Thankfully, in the EQ editor, as seen in the following picture, and as said before, you can narrow the breadth of the affected frequency range by scrolling with the mouse.
- Normalize at -1db.
- Change the viewer from spectrogram to waveform. See those spikes in the corresponding image? Those spiky fuckers will be the bane of your life. A single protruding spike in the waveform will prevent the song from normalizing correctly, as it will adjust to the loudest millisecond of sound. I doubt that using some “limiter” operation is a good idea here, because you will shear part of the sound. I just carefully zoom into those parts, select the spike, and reduce its volume level with the Gain tool. You will likely need to do this dozens of times as you adjust the volume of the song.
- Use the clip gain tool, as seen in the corresponding image further down below, to properly raise or lower the volume of certain parts of the song. It’s usually a good idea to match the volume levels of all the song parts, but some do seem to need to sound lower. It’s a matter of taste.
- Finally, normalize at -1db.
Images for point 17:


Image for point 19:

Image for point 20:

Anyway, I hope this post helped if you’re also embarked on the marvellous journey of mastering songs. And if not, well, screw you.

You must be logged in to post a comment.